Qemu is nice and highly configurable. Compared to other virtual
environments, it is much more flexible, offering a lot of
potential. However, it can sometimes be daunting to use due to
the overwhelming number of options.
Fortunately, the community has developed a user-friendly UI
interface for Qemu, which aids in the configuration and setup
process. This is known as the Virtual Machine Manager, or
virt-manager (Ref. 1).
Some preparatory work
First check if the virtual machine is enabled in your machine:
egrep -c '(vmx|svm)' /proc/cpuinfo
This counts the occurrences of the vmx/svm features supported by
your CPU. The result should be a number equal to the number of
cores in your machine.
If the number received from that command is '0', it means that
the virtualization feature needs to be enabled in the BIOS.
Ensure that the following packages are installed on your PC, or
install them if necessary:
At this point, we are ready to start our virt-manager.
This part is largely inspired by Veronica's vlog, which I found
to be very neat and clear, devoid of the usual extra fluff found
in blogs. If you encounter any issues setting up virt-manager,
check out her video (Ref. 2).
Network bridge
While setting up the virtual machine in the previous section,
you were asked about the network interface to use. For this we
will setup an ad-hoc bridge that will connect our Virtual OS
to the network.
A network bridge is a virtual network that forwards packets to
our physical interface.
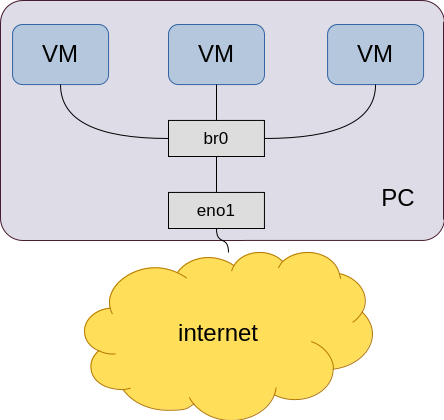
Structure of a network bridge
In the picture eno1 represent the physical ethernet
interface. We need to create a br0 virtual
interface where to which the Virtual Machines will be connected.
All their traffic will be routed by the bridge to eno1, enabling
our virtual machines to connect to the network.
Let's start by creating the bridge:
ip link add name br0 type bridge
Enable the interface:
ip link set dev br0 up
Let's assign it the address 192.168.1.201. It needs to be in the
same network domain of the network where the PC is connected, in
order to be able to be routed outside:
ip address add 192.168.1.201/24 dev br0
Now we set up the default gateway:
ip route append default via 192.168.1.1 dev br0
And finally we link the virtual interface br0 with
the physical interface eno1:
ip link set eno1 master br0
Now the network on the Virtual Devices should be up and running
and they can be assigned their own address through dhcp.